The first step is to establish the EZDD database in Oracle by using the Oracle Import utility. All the files needed are in the C:\EZDD\Databases\Oracle Files\ folder.
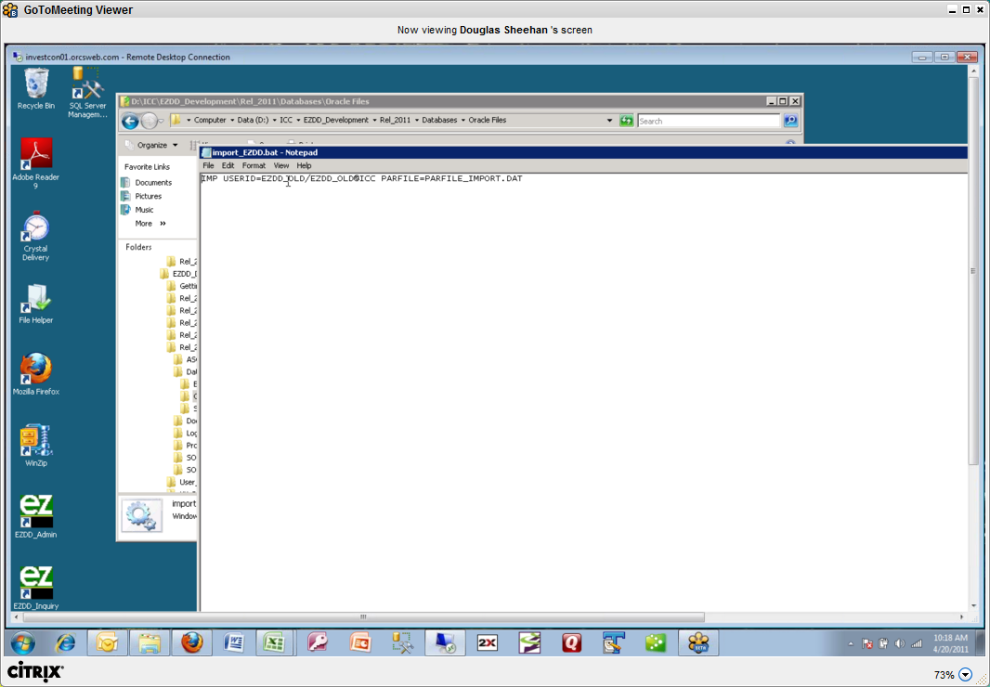
First inspect the import_EZDD.bat file to see the following line:
IMP USERID=EZDD_OLD/EZDD_OLD@ICC PARFILE=PARFILE_IMPORT.DAT

Now change the user code EZDD_OLD to the user code that will own your EZDD tables (EZDD in this example). Then change the password to the correct one for that user code (EZDD in this example) and change ICC to be the name of the Oracle instance that will store your EZDD tables (it remains ICC in this example).
Next review the file PARFILE_IMPORT.DAT to see the following lines:
FROMUSER=EZDD
INDEXES=y
BUFFER=2048
RECORDLENGTH=2048
CONSTRAINTS=y
FILESIZE=10430464
LOG=IMPORTEZDD.LOG
ROWS=Y
STATISTICS=NONE
All of these will probably be fine but should be reviewed by the DBA.
The file containing the data to be imported is in the same folder, and is called EXPDAT.DMP. This file is used internally by the import process and doesn't need review. To see how it was generated, the files used for the export are also included in this folder. They will not be needed for your process but are provided for reference if desired. They are named export_EZDD.bat and EXPORTEZDD.LOG.
Also provided as reference is a document named EZDD_TABLES.SQL. This is not used in the process, but illustrates the table structure of the database that will be created.
Next review the sample log file, named IMPORTEZDD.LOG. This file demonstrates a successful import process and illustrates what your import log should look like once your import process is completed. The IMPORTEZDD.LOG file looks like this:
Connected to: Oracle Database 10g Enterprise Edition Release 10.2.0.4.0 - 64bit Production
With the Partitioning, OLAP, Data Mining and Real Application Testing options
Export file created by EXPORT:V10.02.01 via conventional path
import done in US7ASCII character set and AL16UTF16 NCHAR character set
import server uses AL32UTF8 character set (possible charset conversion)
. importing EZDD's objects into EZDD_OLD
. . importing table "ADMIN_USERS" 2 rows imported
. . importing table "COLUMNS" 479 rows imported
. . importing table "CONFIGURATION" 0 rows imported
. . importing table "DATABASES" 4 rows imported
. . importing table "DATABASE_AUTHORITY" 0 rows imported
. . importing table "EXPORT000010" 1036 rows imported
. . importing table "EZDD_CONFIGURATION" 4 rows imported
. . importing table "EZDD_EXPORT" 1035 rows imported
. . importing table "INDEXES" 141 rows imported
. . importing table "INTERFACES" 6 rows imported
. . importing table "INTERFACE_COLUMNS" 134 rows imported
. . importing table "LOOKUP_TABLES" 0 rows imported
. . importing table "RELATIONSHIPS" 48 rows imported
. . importing table "REPORT_TEMPLATE" 0 rows imported
. . importing table "TABLES" 54 rows imported
. . importing table "TRANSLATIONS" 5 rows imported
. . importing table "WORK_COLUMNS" 0 rows imported
. . importing table "WORK_INDEXES" 0 rows imported
. . importing table "WORK_RELATIONSHIPS" 0 rows imported
. . importing table "WORK_TABLES" 0 rows imported
Import terminated successfully without warnings.
Now that the files have been reviewed and modified as required, the next step is to open a DOS window and run the import_EZDD.bat file from the Oracle_Files directory:
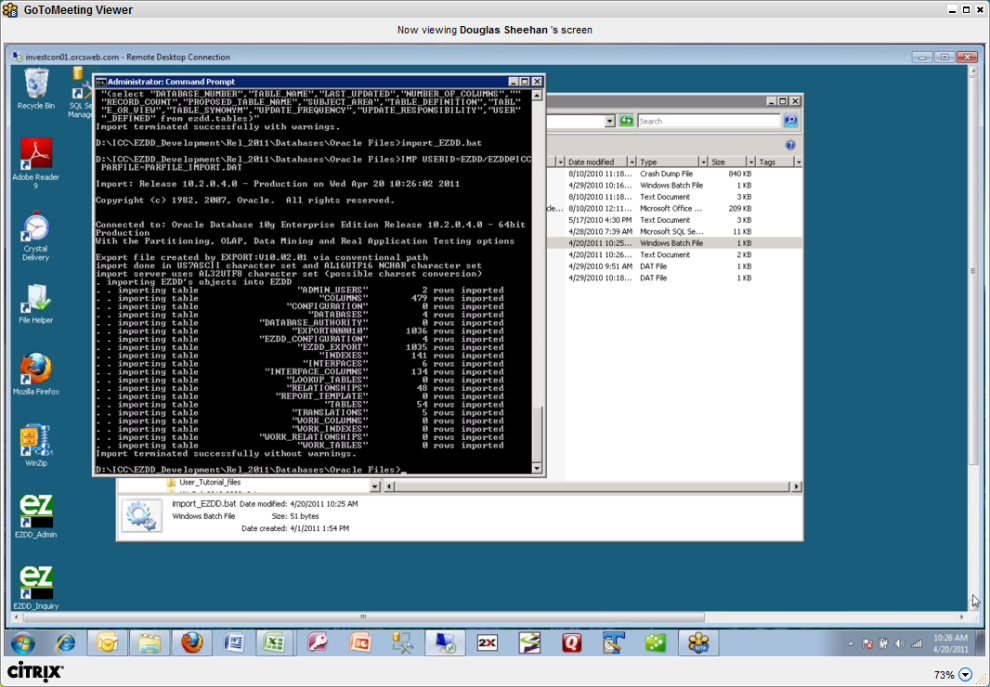
Review the resulting log file and verify that the EZDD tables were created for the user as specified (user=EZDD in this example):

Once the database is established in Oracle, it will be important to assign users to the roles established, using the following guidelines:
1. EZDD_Admin. This is the role assigned to the EZ Data Dictionary administrator who has authority to add included databases to the EZDD database, as well as to perform all other administrative functions in the program EZDD_Admin.
2. EZDD_Select. This is the role assigned to all users who will be able to run the EZDD_Inquiry program and view the metadata. This will not give them authority to update any of the definitions.
3. EZDD_Update. This is the role assigned to all users who will be able to update definitions, user notes, etc. in the EZDD database.
These roles will already be established after the database is imported into Oracle with the commands in the file ezdd_roles.txt. The roles but can be changed or renamed using similar commands.
ezdd_roles.txt:
grant select on Admin_Users to EZDD_Select;
grant select on Columns to EZDD_Select;
grant select on Configuration to EZDD_Select;
grant select on Database_Authority to EZDD_Select;
grant select on Databases to EZDD_Select;
grant select on EZDD_Configuration to EZDD_Select;
grant select on Indexes to EZDD_Select;
grant select on Interface_Columns to EZDD_Select;
grant select on Interfaces to EZDD_Select;
grant select on Lookup_Tables to EZDD_Select;
grant select on Relationships to EZDD_Select;
grant select on Report_Template to EZDD_Select;
grant select on Tables to EZDD_Select;
grant select on Translations to EZDD_Select;
grant select on Work_Columns to EZDD_Select;
grant select on Work_Indexes to EZDD_Select;
grant select on Work_Relationships to EZDD_Select;
grant select on Work_Tables to EZDD_Select;
grant update on Admin_Users to EZDD_update;
grant update on Columns to EZDD_update;
grant update on Configuration to EZDD_update;
grant update on Database_Authority to EZDD_update;
grant update on Databases to EZDD_update;
grant update on EZDD_Configuration to EZDD_update;
grant update on Indexes to EZDD_update;
grant update on Interface_Columns to EZDD_update;
grant update on Interfaces to EZDD_update;
grant update on Lookup_Tables to EZDD_update;
grant update on Relationships to EZDD_update;
grant update on Report_Template to EZDD_update;
grant update on Tables to EZDD_update;
grant update on Translations to EZDD_update;
grant update on Work_Columns to EZDD_update;
grant update on Work_Indexes to EZDD_update;
grant update on Work_Relationships to EZDD_update;
grant update on Work_Tables to EZDD_update;
grant Select,Update,insert,delete on Admin_Users to EZDD_Admin;
grant Select,Update,insert,delete on Columns to EZDD_Admin;
grant Select,Update,insert,delete on Configuration to EZDD_Admin;
grant Select,Update,insert,delete on Database_Authority to EZDD_Admin;
grant Select,Update,insert,delete on Databases to EZDD_Admin;
grant Select,Update,insert,delete on EZDD_Configuration to EZDD_Admin;
grant Select,Update,insert,delete on Indexes to EZDD_Admin;
grant Select,Update,insert,delete on Interface_Columns to EZDD_Admin;
grant Select,Update,insert,delete on Interfaces to EZDD_Admin;
grant Select,Update,insert,delete on Lookup_Tables to EZDD_Admin;
grant Select,Update,insert,delete on Relationships to EZDD_Admin;
grant Select,Update,insert,delete on Report_Template to EZDD_Admin;
grant Select,Update,insert,delete on Tables to EZDD_Admin;
grant Select,Update,insert,delete on Translations to EZDD_Admin;
grant Select,Update,insert,delete on Work_Columns to EZDD_Admin;
grant Select,Update,insert,delete on Work_Indexes to EZDD_Admin;
grant Select,Update,insert,delete on Work_Relationships to EZDD_Admin;
grant Select,Update,insert,delete on Work_Tables to EZDD_Admin;
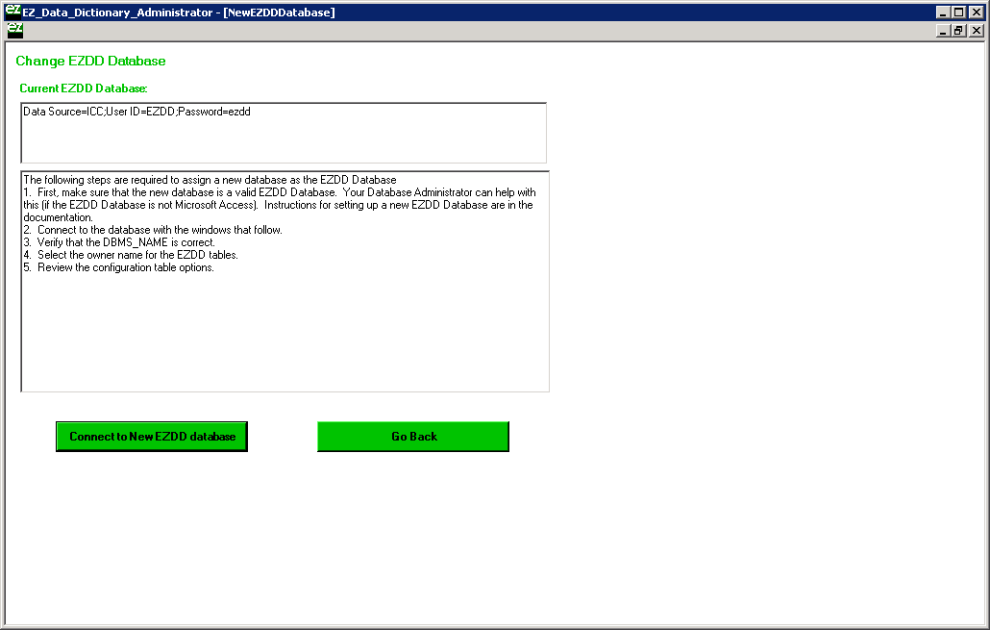
Now that the EZDD database is created in Oracle, the application can be modified to use this particular EZDD database. This is done by running the EZDD_Admin program, and choosing the top menu item EZDD_Special_Functions, and then Change EZDD Database under that. Click the Connect to New EZDD database button on the screen that appears.
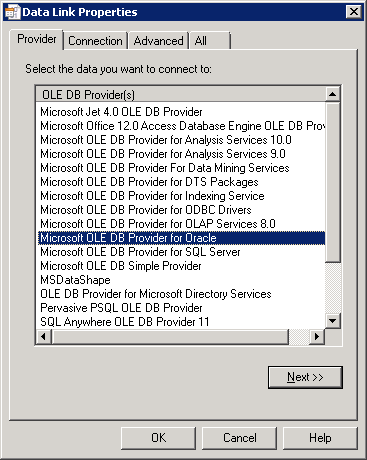
Next will appear the Data Link Properties screen, where Microsoft OLE DB Provider for Oracle can be selected, then click Next.
Next will appear the Connection tab. The name of the Oracle instance should be entered for the location of the EZDD Database (ICC in this example), and then the user code and password to be used when EZDD_Admin is run.
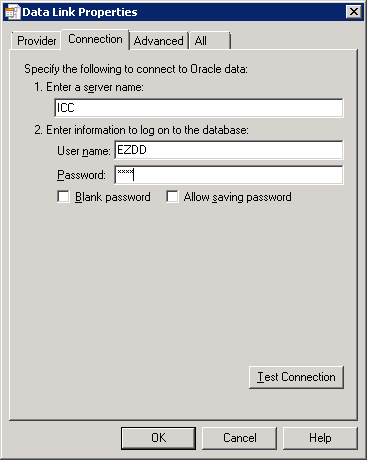
Click on Test Connection and verify that the connection succeeds and displays this window:

Now, click OK, and OK again. The screen shown below will appear. Enter the user code and password (or nothing if you are using windows authentication), and make sure the DBMS Name says Oracle, then click Connect.
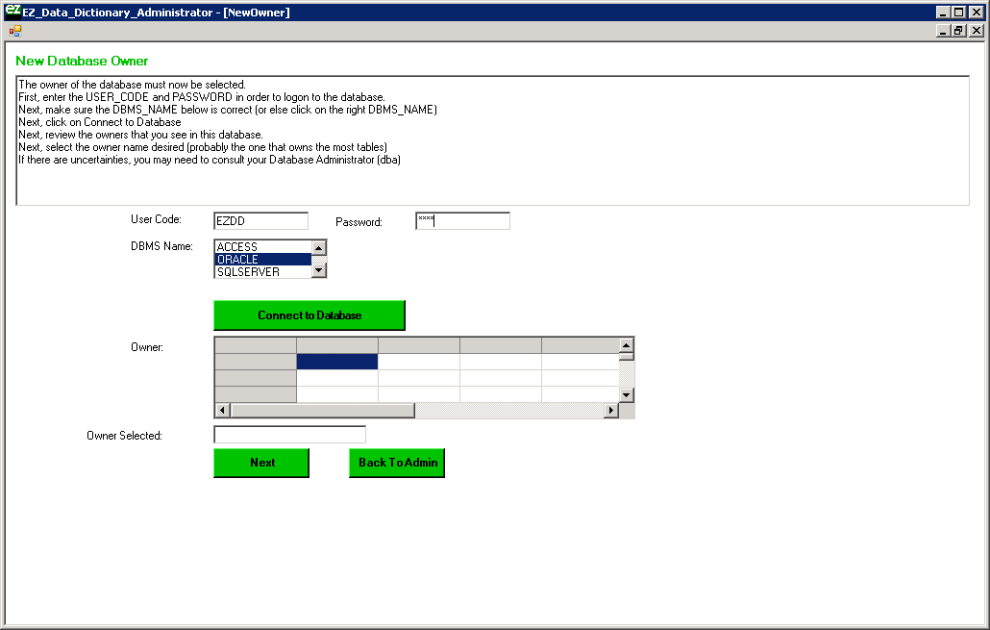
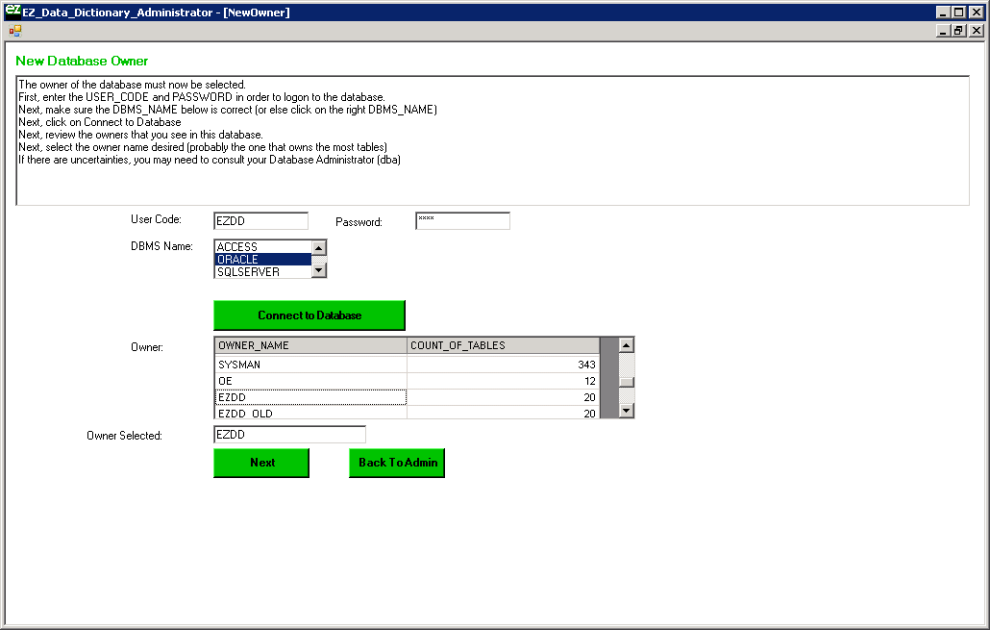
Select the owner of the EZDD tables (which is EZDD in our example), and when that owner appears in the text box, click Next:
A screen will appear showing the configuration information. In most cases the password appearing in the right column should be deleted to force the user to supply that password at logon time. Click on Update and then Next.
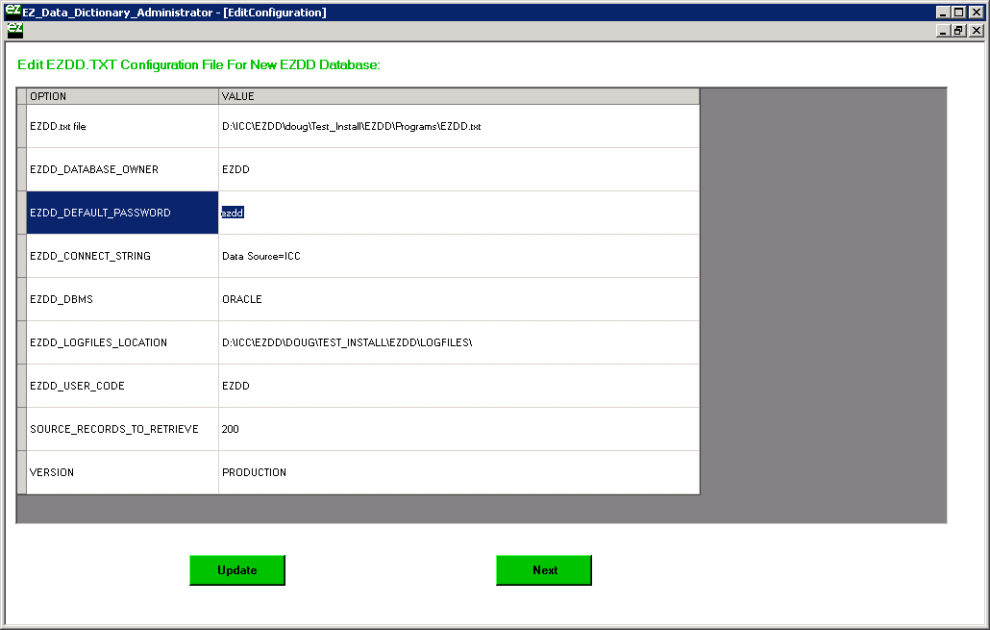
The EZDD Database is now setup in Oracle, and the EZ Data Dictionary® application will use the EZDD Database in Oracle each time it is initiated. The C:\EZDD\Programs\EZDD.txt file will be similar to what is shown below, specifying that the EZDD_Connect_String points to the Oracle version of the EZDD Database.
EZDD.txt file=D:\ICC\EZDD\doug\Test_Install\EZDD\Programs\EZDD.txt
EZDD_DATABASE_OWNER=EZDD
EZDD_DEFAULT_PASSWORD=
EZDD_CONNECT_STRING=Data Source=ICC
EZDD_DBMS=ORACLE
EZDD_LOGFILES_LOCATION=D:\ICC\EZDD\DOUG\TEST_INSTALL\EZDD\LOGFILES\
EZDD_USER_CODE=EZDD
SOURCE_RECORDS_TO_RETRIEVE=200
VERSION=PRODUCTION